A car seat keeps your little one safe on the road, whether you’re going for a quick errand to your nearest supermarket or a weekend road trip. Choosing the right baby car seat matters, but knowing how to install it correctly is equally essential.
Whether your car comes with ISOFIX anchor points or requires a seatbelt installation, this step-by-step guide will help you understand all the different components, installation methods, and important safety checks.
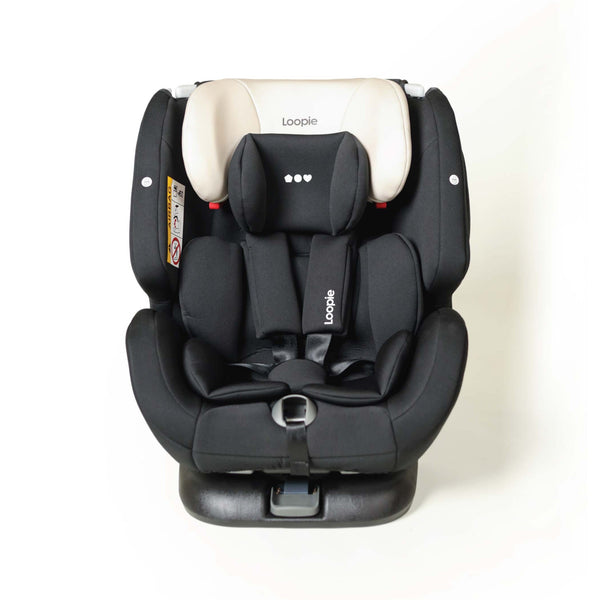
We are using the Loopie Lap car seat in this blog to demonstrate the installation methods, although the steps for installation are largely similar across car seats. Let’s get started.
Getting to Know the Loopie Lap Baby Car Seat
Before installing the Loopie Lap baby car seat, it’s helpful to quickly run through all the different components and installation options.
The Loopie Lap is a convertible car seat designed for children from birth to 12 years (up to 36 kg). The car seat is suitable for both ISOFIX & seat belt installation. Here are the key components for the car seat installation:
|
Component |
What it does |
|
ISOFIX Connectors |
Attach the baby car seat directly to your car’s ISOFIX anchor points. |
|
ISOFIX Guides |
Used in case your car’s ISOFIX anchor points are recessed. (As seen in certain cars from Hyundai & Maruti Suzuki) |
|
Top Tether |
Additional anchoring point for the top of the baby car seat |
|
3-Point Vehicle Seat Belt |
Your vehicle’s built-in seat belt, in case your car doesn’t have an ISOFIX. |
|
360 Degree Rotation Lever |
Used to turn the car seat from rear-facing to forward-facing. Makes it easier to access your child. (Only in ISOFIX installation) |


Before proceeding with the installation of your child car seat, refer these quick car seat guidelines for safe and comfortable use.
Loopie Lap Car Seat Installation Methods
One of the practical features of the Loopie Lap baby car seat is that it supports both installation methods—with ISOFIX as well as seat belt installation. Since ISOFIX is not mandatory in India, dual installation methods make the car seat compatible with all Indian cars.
Note: The 360-degree rotation function is available with ISOFIX installation, not seat belt installation.
Installing the Baby Car Seat using ISOFIX
If your car comes with ISOFIX anchor points, this is one of the methods available to you for safe installation of your baby car seat. Check the indicators on the bottom of the rear seats of your car to verify whether your car is ISOFIX compatible.
Here’s how to approach the installation:
Step 1: Position the Child Car Seat
-
Locate the ISOFIX anchor points on either side of the rear passenger seat and place your car seat
Step 2: Extend the ISOFIX Connectors on your car seat
-
Press the buttons on the ISOFIX connectors and fully extend the ISOFIX rods on both sides of the baby car seat.

ISOFIX Connectors (left) being aligned with the ISOFIX anchor point
Step 3: Align the ISOFIX Connectors with the Anchor Points
-
Align the tip of the connectors with the respective anchor points on both sides.
-
Ensure that the tips of the connectors are equally engaged with the anchor points.
Step 4: Push the Car Seat
-
Once you have aligned the connectors with the anchor points, push the baby car seat towards the backrest of the rear passenger seat till you hear a click sound.
-
The ISOFIX indicators will turn green when they’re securely attached. Always verify that the indicators have turned green.

Push the car seat back firmly till you hear a click
Step 5: Rotate the Car Seat for![]() Rear-Facing Mode
-
Pull the lever at the bottom front of the car seat to engage the rotation mechanism.
-
Once the rotation mechanism is engaged, simply turn the car seat, facing the backrest of the rear passenger seat.

Pull the lever with one hand and use the other hand to turn the car seat
Attaching the Top Tether of Your Car Seat
For an additional layer of support, you can further secure the top of your car seat with the Top Tether. Please note that once attached, the top tether restricts the 360-degree rotation of the car seat. Here’s how you can attach it:
Pull out the top tether from the pouch at the back and pass it through the guide
-
Take the tether out of the pouch at the back of the baby car seat.
-
Pass the tether through the guides at the top of the car seat
-
Now pass the top tether behind the rear passenger seat towards the boot of the car.

Take the top tether towards the trunk of the car
Note: In some cars, you may have to remove the plate behind the headrest of your rear passenger seats to pass the tether towards the boot space.
-
Connect the hook of the tether to the top-tether anchor points in the boot of your car.
-
Pull the tether belt till the indicator on the buckle turns green for secure attachment.

Press the white button on the buckle and pull the top tether to tighten
How to Install the Baby Car Seat Using a Seatbelt (For Cars Without ISOFIX)
Don’t have ISOFIX in your car? You can still install the Loopie Lap Car Seat with your vehicle’s 3-point seat belt. Since 360-degree rotation can’t work with a seat belt installation, place the baby car seat in rear-facing mode or forward-facing as per your child’s age and stage.
Car Seat Groups & Seating Position
|
Car seat group |
Child's weight |
Recommended orientation |
|
Group 0+ |
0–13 kg |
Rear-facing |
|
Group 1 |
9–18 kg |
Rear-facing or forward-facing |
|
Group 2 |
15–25 kg |
Forward-facing |
|
Group 3 |
22–36 kg |
Forward-facing |
A safety tip for parents: Keep your baby rear-facing for as long as the baby car seat allows within its specified limits. Rear-facing positioning helps distribute crash forces across the child's developing head, neck, and back.
Car Seat Installation in Rear-Facing Mode with Seat Belt
Step1: Position the child seat
-
Place the Loope Lap car seat facing the backrest of your selected rear passenger seat.
-
Ensure that the base sits correctly on the seat

Step 2: Identify the correct seat belt guides
-
Locate the belt paths indicated around the waist and the top of the child car seat.
-
Refer to the instruction manual to identify the correct routing for rear-facing or forward-facing installation.

Check the indicators for guides at the top and the bottom
Step 3: Route the Vehicle Seatbelt
-
Pull out your car’s seat belt and stretch it as much as you can.
-
First, secure the base of the car seat. Pass the seat belt from the waist guide across the car seat & fasten it into the vehicle’s buckle.

Pass the seat belt below the cushions and fasten it -
The seat belt should be passed beneath all the cushioning of the baby car seat.
-
Now, to secure the top of the car seat, take the remaining loose part of the seat belt from the back side of the car seat, and pass it through the seat belt guide at the top, diagonally opposite to the vehicle’s seat belt buckle.
Step 4: Check the Installation
-
Check that the seatbelt is correctly routed.
-
Ensure it is securely fastened and tightened.
-
Confirm that the car seat does not move excessively at the belt path.
Car Seat Installation in Forward-Facing Mode with Seat Belt
Per R44 certification, your child should weigh at least 9 kg (approx. 9 months old) to turn the car seat forward. Follow these steps to install the car seat correctly: 
Step 1: Position the car seat in the forward-facing position
-
Place the Loopie Lap baby car seat facing the front of the vehicle
-
Ensure that the base sits correctly on the seat
Step 2: Secure the Base of the Car Seat
-
Pull out your car’s seat belt and stretch it as much as you can.
-
First, secure the car seat base. Pass the seat belt from the waist guides across the car seat & fasten it into the vehicle’s buckle.

-
The seat belt should be passed beneath the seat cushion and the 5-point harness of the baby car seat.

Step 3: Secure the Top of the Car Seat
-
Take the remaining loose part of the vehicle’s seat belt and pass it through the red seat belt guides beneath the headrest of the car seat.
-
Finally, check that the seat belt is correctly routed and securely fastened.

Common Baby Car Seat Installation Mistakes to Avoid
Even with a well-designed and intuitive car seat, a few common installation mistakes can reduce its intended safety performance. Here are some things that parents should watch out for:
|
Common Mistake |
How to Fix It? |
|
Incorrect ISOFIX Attachment |
Check both connectors and their locking indicators. |
|
Loose Top Tether |
Attach it to the top tether anchor point and tighten it till the indicator turns green. |
|
Incorrect Seat Belt Routing |
Always follow the indicated belt path. |
|
Twisted Seat Belt or Harness |
Check that all straps lie flat. |
Apart from these common mistakes, read this blog to know how to keep your baby comfortable in the car seat.
Frequently Asked Questions About Car Seat Installation
Can I install the Loopie Lap without ISOFIX?
Yes! The Loopie Lap supports installation using your vehicle's three-point seatbelt, making it suitable for compatible cars that do not have ISOFIX anchor points.
Can I install the Loopie Lap using both ISOFIX and a seatbelt?
The ISOFIX and seatbelt methods are alternative installation options. Follow the specific installation method described in the product manual. Do not combine them unless explicitly instructed by the manufacturer.
Can I use the 360° rotation feature with seat belt installation?
No. The 360° rotation feature is available with ISOFIX installation. It is not available when the Loopie Lap is installed using the vehicle seatbelt.
Can I install the Loopie Lap in the front passenger seat?
No, you shouldn’t install car seat in the front passenger seat. An active front passenger airbag can pose a serious risk to a child in a rear-facing car seat.
Can I install the Loopie Lap in the middle seat at the back?
We do not recommend the middle rear seating position for the Lap. Many vehicles do not have suitable ISOFIX anchor points or compatible three-point seatbelt arrangements in the middle. We recommend using a compatible left or right rear passenger seat.

A Safe Journey Begins with the Right Baby Car Seat Installation
Installing a baby car seat doesn't have to feel complicated. Once you understand the different components, installation options, and adjustments, the process becomes much easier.
With the Loopie Lap, parents have the flexibility of ISOFIX + Top Tether or three-point seatbelt installation, depending on their vehicle. Its adjustable design, multiple recline settings and 360° rotation (with ISOFIX installation) make it a practical companion through different stages of childhood.
But remember, the most important part of any car seat is how correctly it is installed and used.
So, before your next family outing, take a moment to check the connectors, straps, harness and seating position.
Because little passengers deserve the right protection on every journey.